How to install PostgreSQL on Ubuntu 16.04
PostgreSQL is a powerful, open source object-relational database system which runs on all major operating systems, including Linux, UNIX and Windows. It is fully ACID compliant, has full support for foreign keys, joins, views, triggers, and stored procedures (in multiple languages).
In this guide, I will describe how to install and configure PostgreSQL on Ubuntu 16.04.
Before installing PostgreSQL let’s ensure that our system is up to date.
sudo apt-get update
sudo apt-get upgrade
Installation
Almost all Linux repositories contain PostgreSQL and we can install PostgreSQL from there. But if you need different versions of PostgreSQL that Ubuntu repositories have, it would be better to install PostgreSQL from its official repositories.
Install from Ubuntu repositories
To install PostgreSQL from Ubuntu repositories just enter the following command into console(terminal):
sudo apt-get install postgresql postgresql-contrib
Install from PostgreSQL repositories
If Ubuntu repository does not contain required version of PostgreSQL (the newest or older one) official PostgreSQL repositories could be used. PostgreSQL repositories support LTS versions of Ubuntu (12.04, 14.04 and 16.04) on amd64 and i386 architectures as well as non-LTS versions.
The repository contains many different packages including third party addons. The most common and important packages are (
substitute the x by required version number):
- postgresql-client-9.x - client libraries and client binaries
- postgresql-9.x - core database server
- postgresql-contrib-9.x - additional supplied modules
- libpq-dev - libraries and headers for C language frontend development
- postgresql-server-dev-9.x - libraries and headers for C language backend development
- pgadmin3 - pgAdmin III graphical administration utility
To add repositories to the system:
Create the file /etc/apt/sources.list.d/pgdg.list and add the following into the file
deb http://apt.postgresql.org/pub/repos/apt/ xenial-pgdg main
Import the repository signing key
wget --quiet -O - https://www.postgresql.org/media/keys/ACCC4CF8.asc | sudo apt-key add -
update the package lists and install required version of PostgreSQL (e.g 9.6)
sudo apt-get update
sudo apt-get install postgresql-9.6
Packages postgresql-contrib-9.6 and postgresql-client-9.6 will be installed automatically. Also psql console utility will be
installed.
psqlis a terminal-based front-end to PostgreSQL. It enables you to type in queries interactively, issue them to PostgreSQL, and see the query results. Alternatively, input can be from a file or from command line arguments. In addition, psql provides a number of meta-commands and various shell-like features to facilitate writing scripts and automating a wide variety of tasks.
Verify PostgreSQL service status
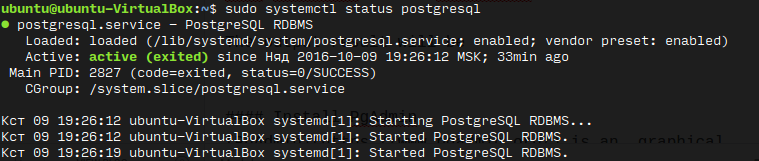
To verify PostgreSQL status after installation enter the following command
sudo systemctl status postgresql
The output result will be
Configure PostgreSQL
During installation postgres user will be created and will be associated with the default Postgres role. Switch over to
the postgres account on your server by typing:
sudo -i -u postgres
Now we can run psql
psql
After successfull login the output will look like:
postgres@ubuntu-VirtualBox:~$ psql
psql (9.6.0)
Type "help" for help.

postgres=#
By default user postgres doesn’t have password. To changed password we can use the following command:
ALTER USER postgres WITH PASSWORD 'postgres';
where postgres is a new password. We can specify any password phrase here.
Now we can close psql by typying \q command into terminal.
If we try to run psql into the following way
psql -U postgres
we will get the following error:
psql: FATAL: Peer authentication failed for user "postgres"
It happens because PostgreSQL uses peer authentication method.
The peer authentication method works by obtaining the client’s operating system user name from the kernel and using it as the allowed database user name (with optional user name mapping). This method is only supported on local connections.
To read more about Authentication Methods please see official PostgreSQL documentation.
To allow postgres user connect to installed database we should change login method to md5. To do that we need to modify
the /etc/postgresql/9.6/main/pg_hba.conf config file. To open this file just enter the following command with sudo
sudo vim /etc/postgresql/9.6/main/pg_hba.conf
The result file should look like:
# Database administrative login by Unix domain socket
local   all             postgres                                md5

# TYPE  DATABASE        USER            ADDRESS                 METHOD

# "local" is for Unix domain socket connections only
local   all             all                                     peer
# IPv4 local connections:
host    all             all             127.0.0.1/32            md5
# IPv6 local connections:
host    all             all             ::1/128                 md5
PostreSQL process should be restarted so that changes to take effect:
sudo systemctl restart postgresql
Connect via psql
Now we can use the following command:
psql -U postgres
Install PgAdmin
PgAdmin is an graphical administration and development utility for PostgreSQL. It may be usefull on desktop environments.
sudo apt-get install pgadmin3
PgAdmin3 supports only PostgreSQL server versions 8.4 to 9.5. It doesn’t support recently released version 9.6. During connection to the PostgreSQL the warning message will be displayed
Warning:

07:48:35 PM: Warning: The server you are connecting to is not a version that is supported by this release of pgAdmin III.

pgAdmin III may not function as expected.

Supported server versions are 8.4 to 9.5.
For development purposes PgAdmin3 will work well with PostgreSQL 9.6.
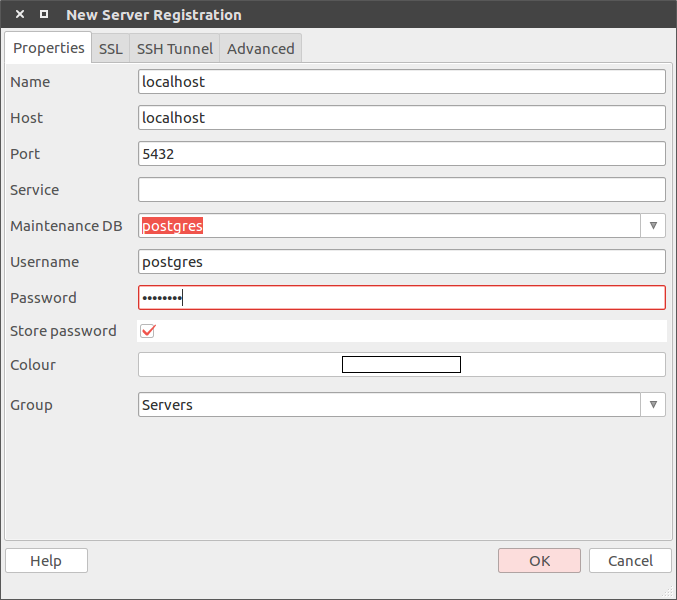
Connect via PgAdmin
Open PgAdmin and press Add a connection to a server button. A new pop-up window will be opened. Fill in the fields into the
following way